Today, I embarked on a soggy pilgrimage to the 8:30 church service, where my ADHD played its usual games with the sermon, leaving it a murky concoction of divine musings and biblical anecdotes.
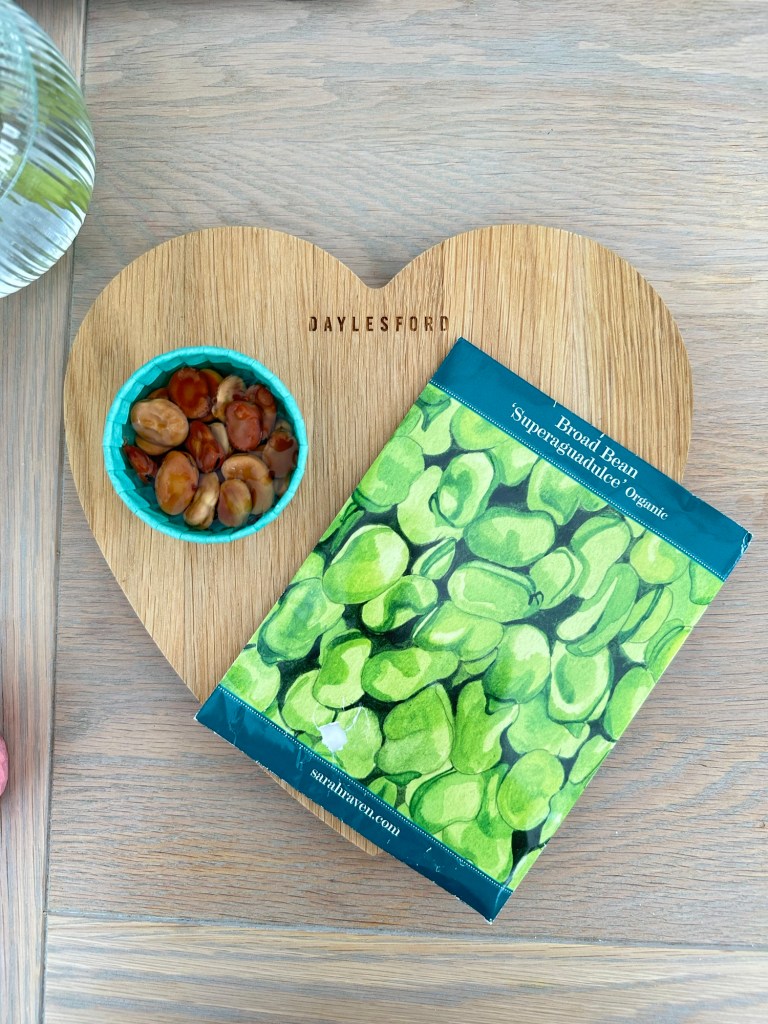
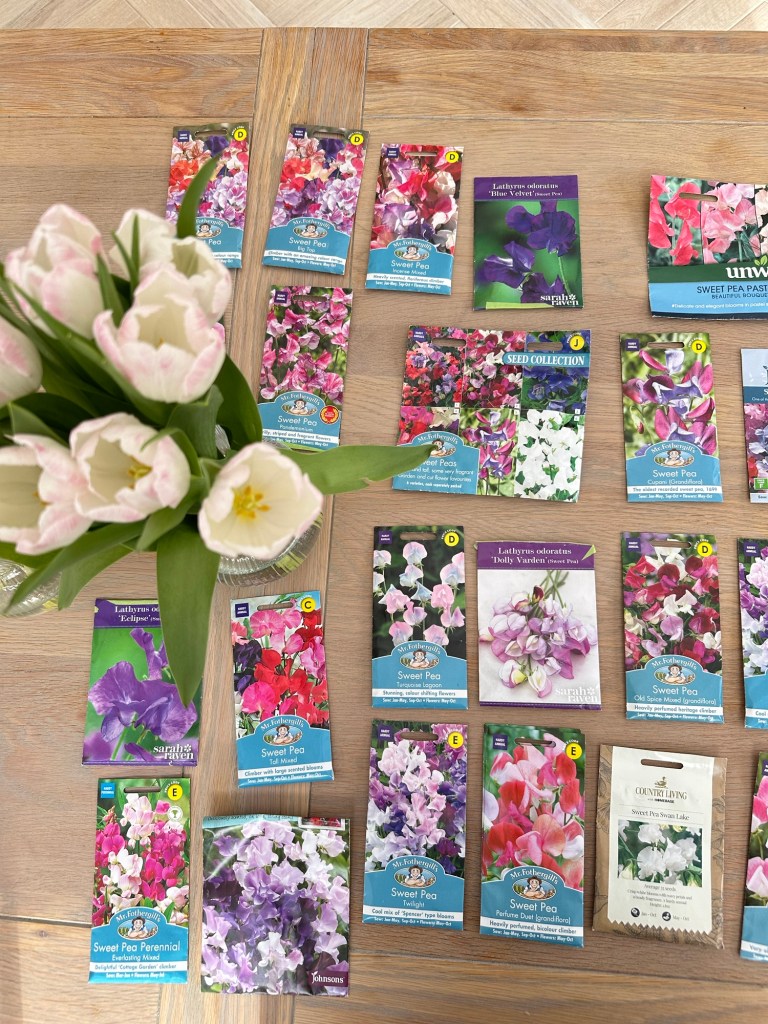
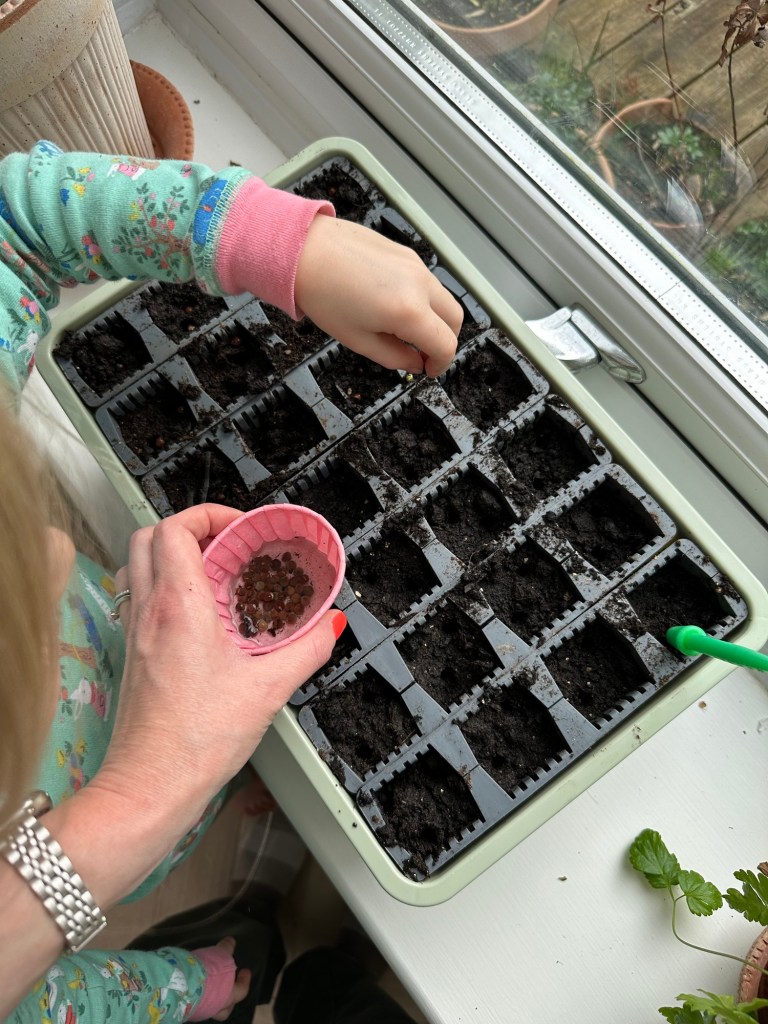
By 9:20, I was back home to plant some sweet peas and broad beans, with some help from some little hands.
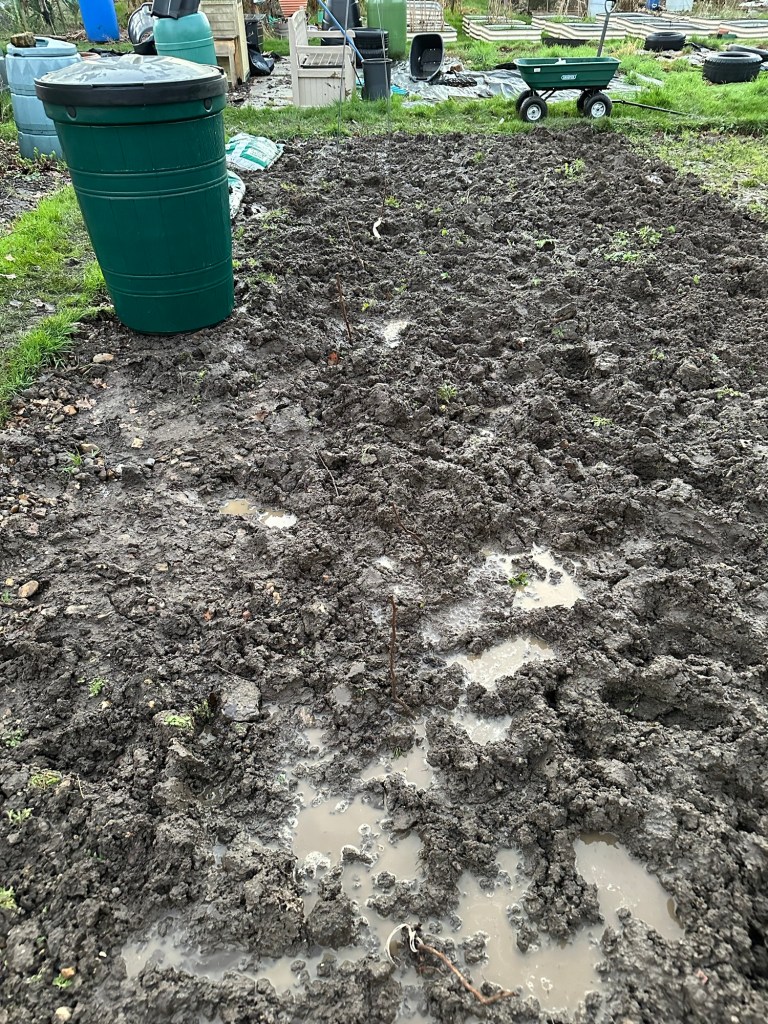
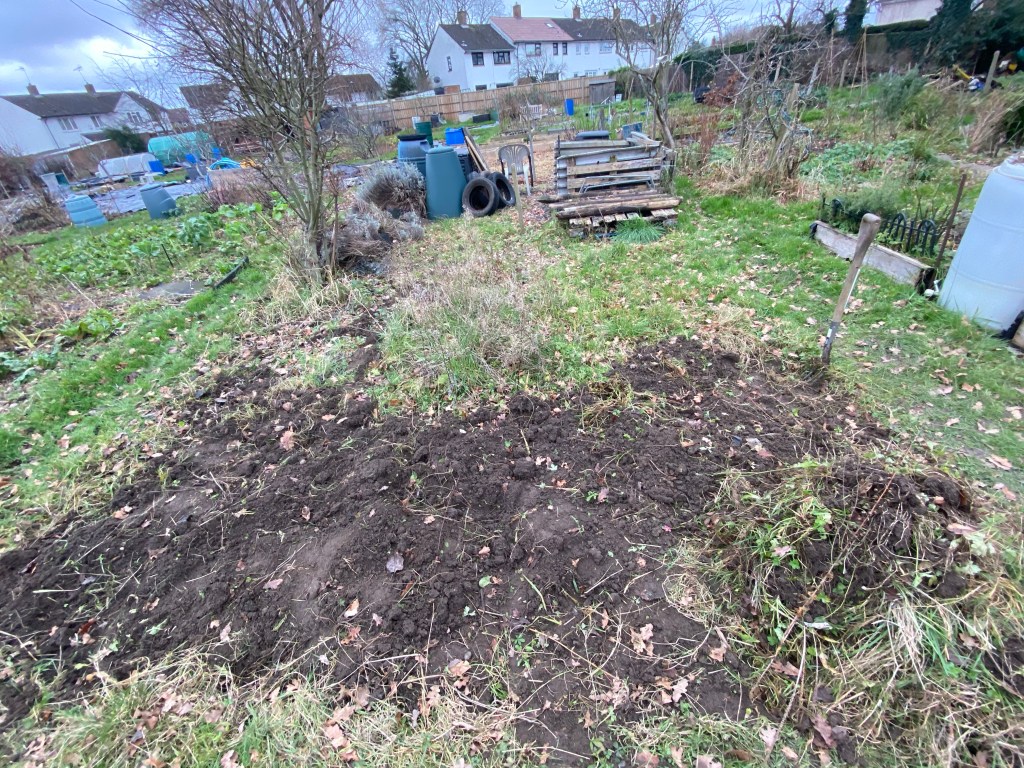
By 11:00, the sun came out to reveal a beautiful spring day. I snuck out of the house to my cherished allotment (my “lottie heaven”), spade in hand, ready to conquer the rain-soaked earth. I managed to dig over a large chunk of the weeds, which was extremely satisfying. The rain had at least made it possible for my spade to slip through the earth like butter.
Returning home, our neighbours were in the kitchen with Mr B, eager to inspect our newly installed City Fibre setup. They invited us to their lovely home to inspect their fitted furniture. I am always impressed when people’s homes are clean enough to have someone view every room with no notice.
As we toured their immaculate abode, I couldn’t help but covet their domestic paradise. Alas, mortgage woes keep such luxuries at bay, leaving me to admire from a distance.
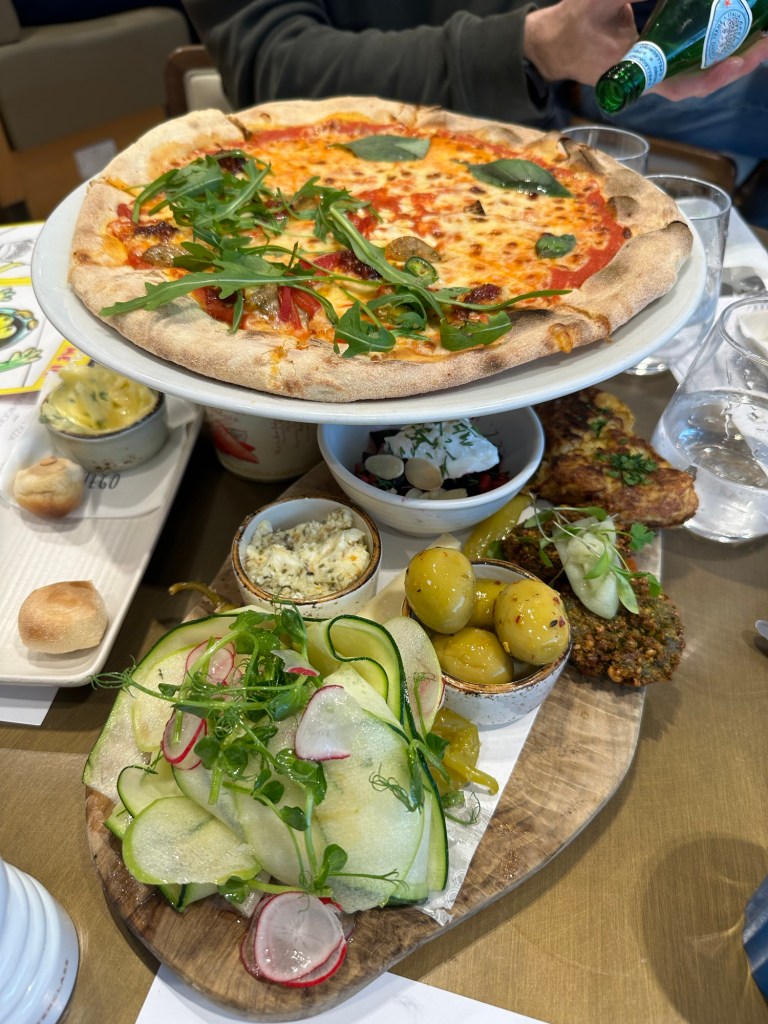
A dinner at Fuego offered a brief respite from the day’s adventures, though plans to plant raspberries were delayed by yet another bout of rain.
Undeterred, we eventually made it back to the allotment, where mud became our constant companion, and laughter echoed through the squelching earth.
And then, just when we thought the day couldn’t get any more adventurous, the girls managed to get themselves stuck in the mud. Amidst the chaos, I managed to plant my raspberries, a small victory amidst the muddy mayhem.
The week leading up the Easter weekend has been very busy!
Monday morning I was super excited to see the council finally take away the rubbish (or most of it).
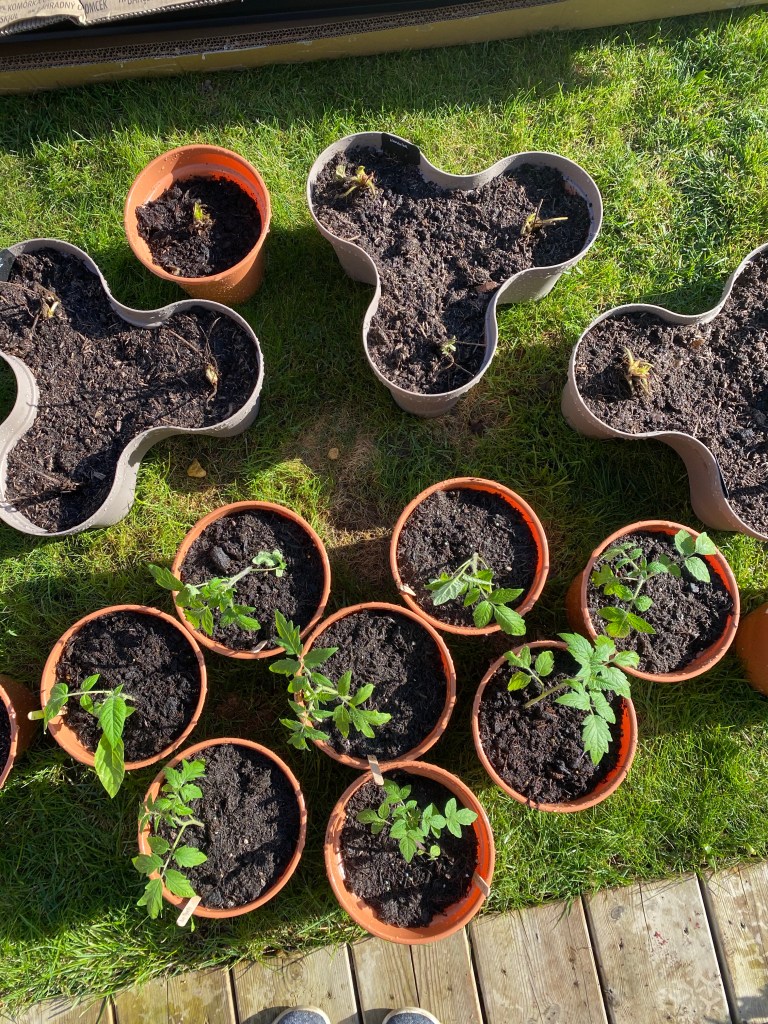
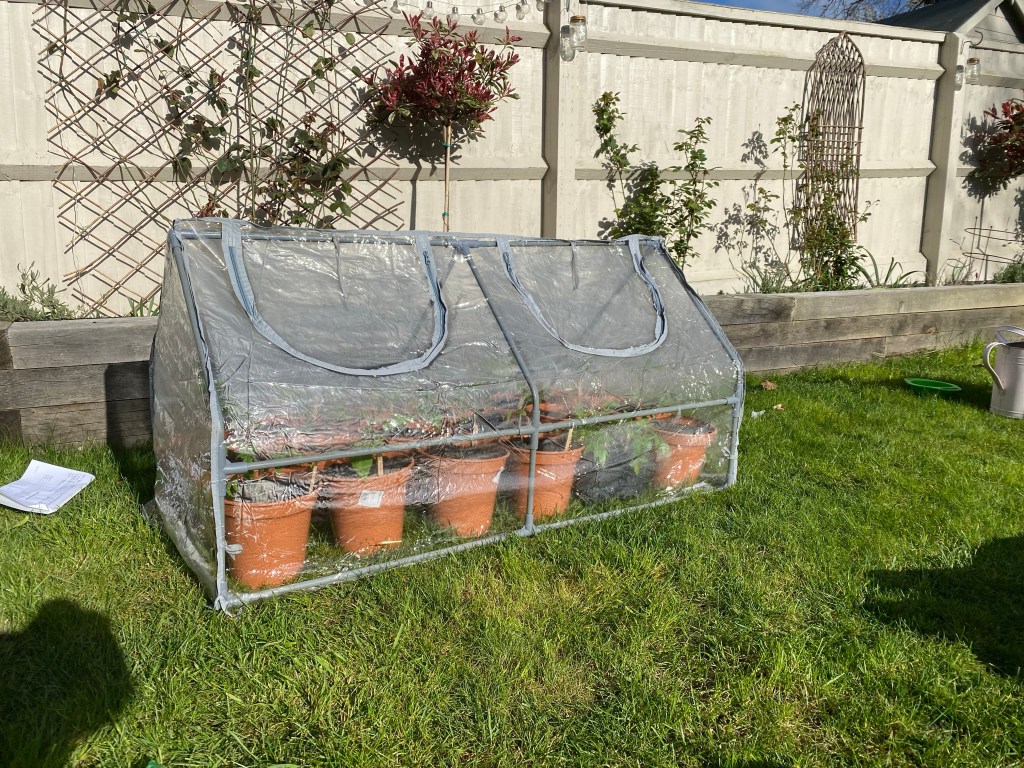
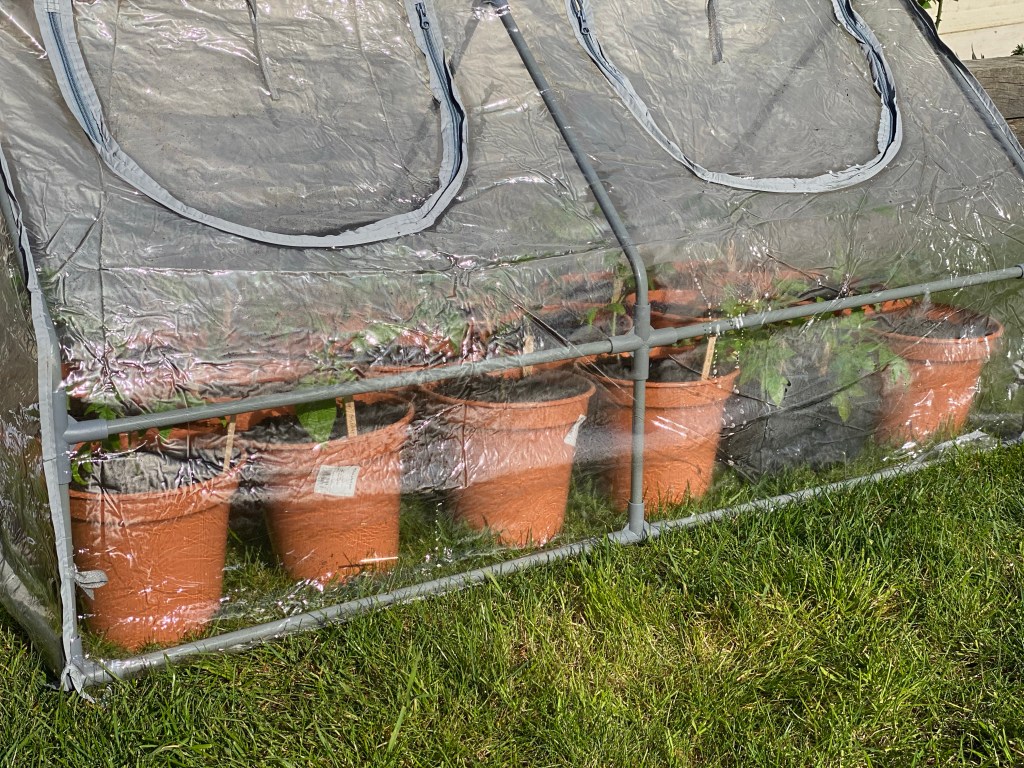
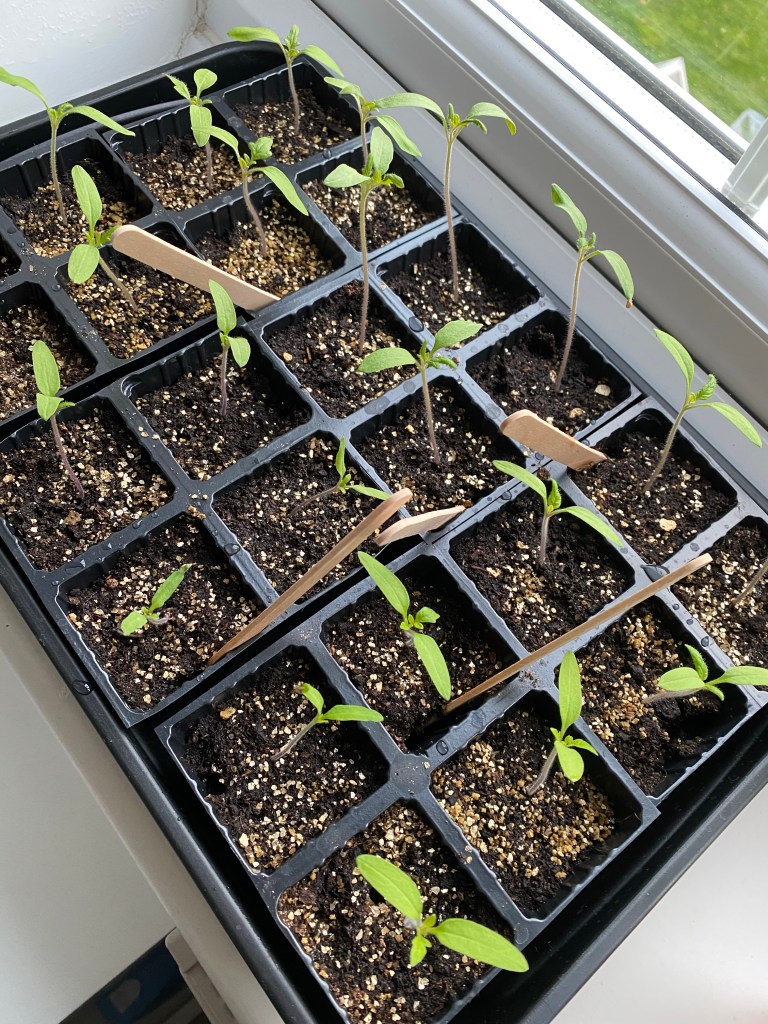
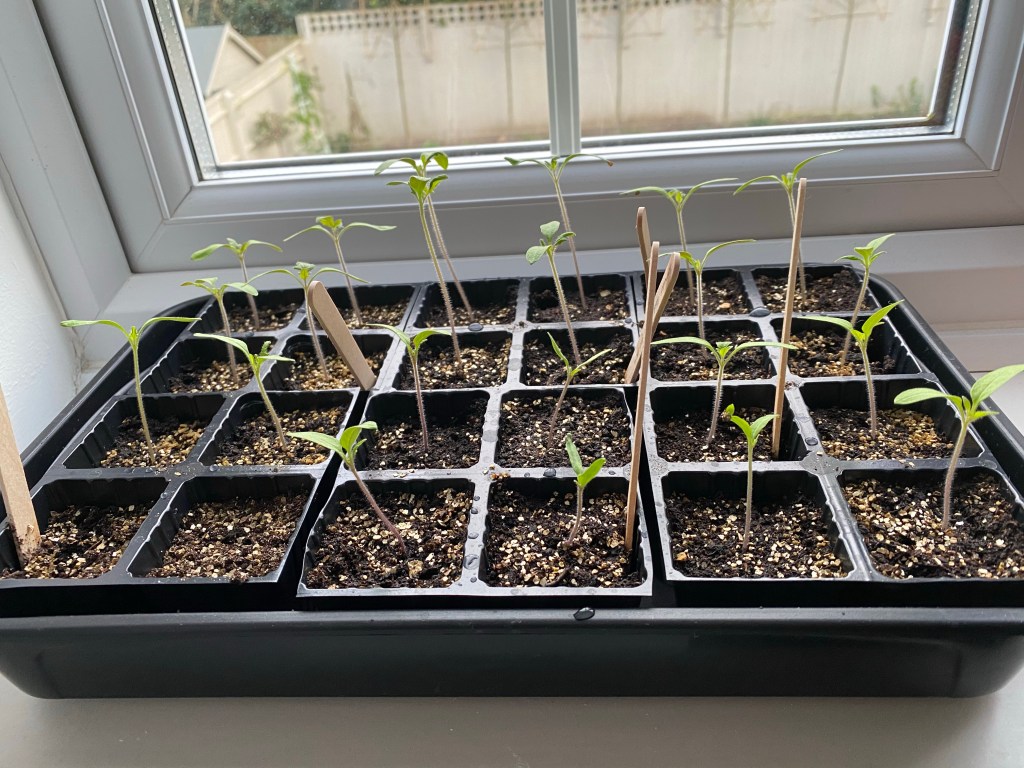
I potted-on the very leggy tomatoes! I’ve moved these to a kind of polytunnel and they’ve been fine so far, but there is an ‘arctic wind’ and temperatures will dip to -3 in the coming days.
I do worry that I’ve been too hasty with these and so have planted an ‘insurance’ set too, along with some new varieties.
Tomatoes moving on up and then out!
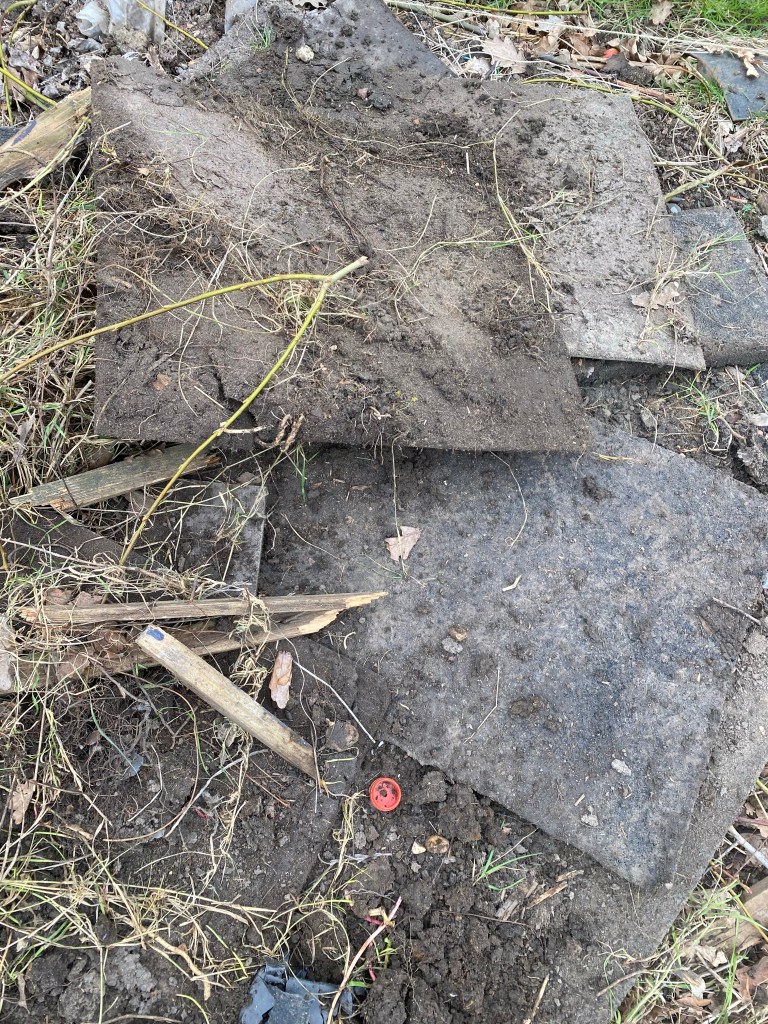
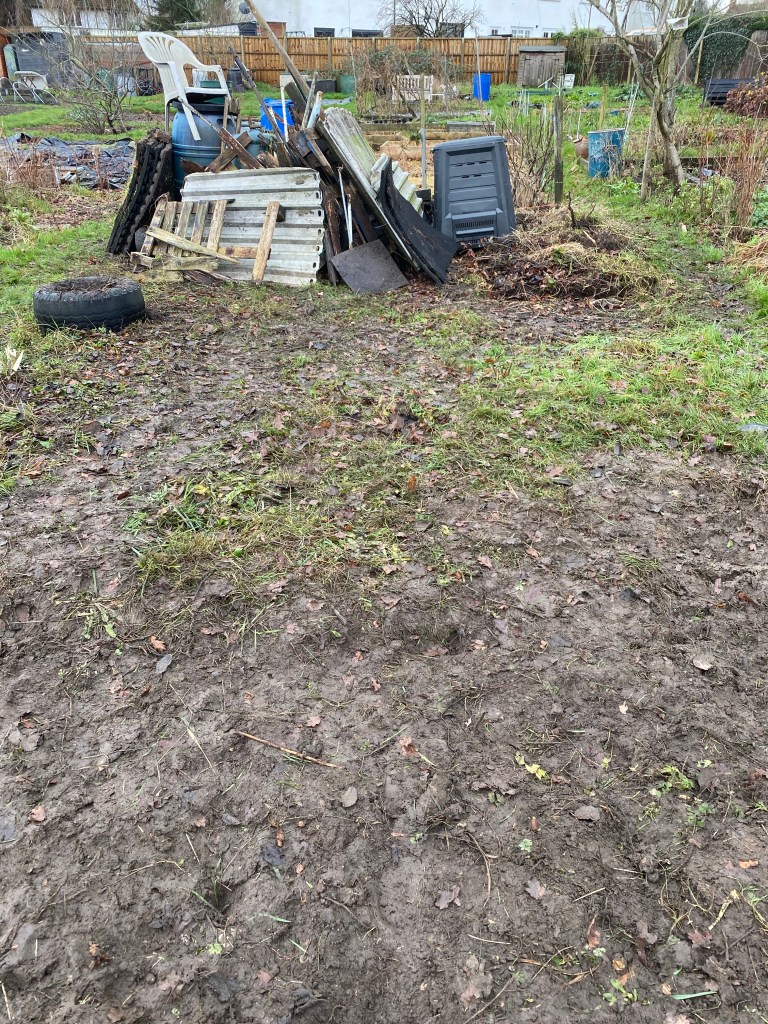
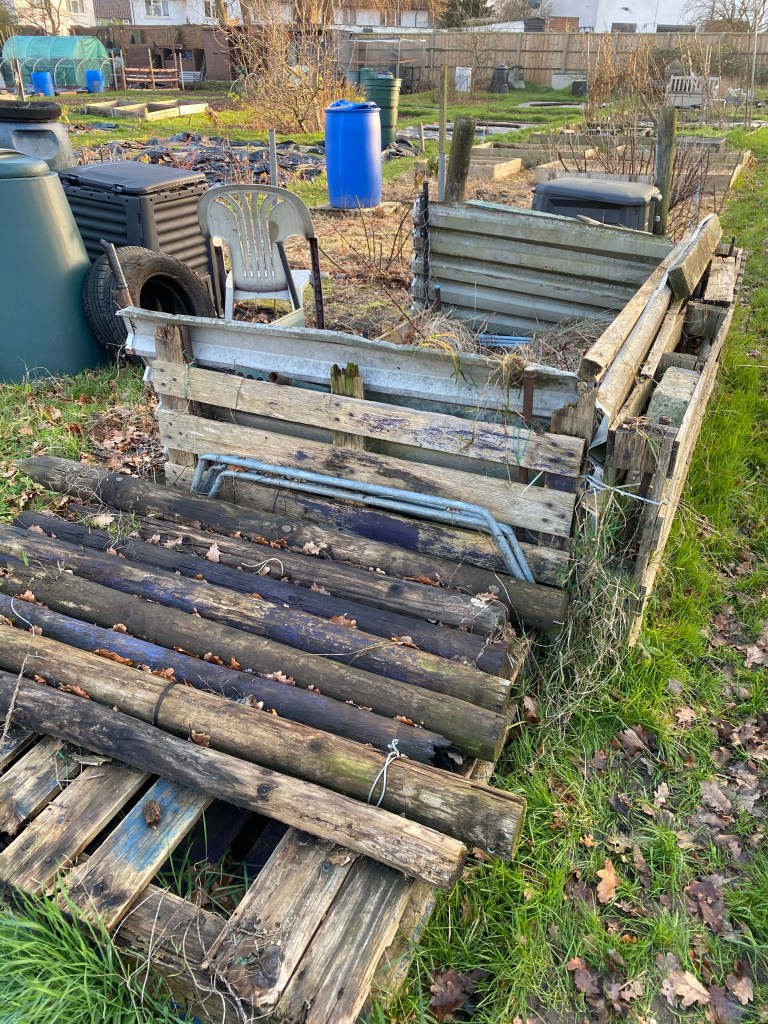
I dug over the messy end of the plot (where the rubbish was) and in the process found numerous old carpet tiles (yes, the weeds had just grown on top!). So now have a new heap which we are slowly moving (yes, Mr B actually helped a tiny bit this weekend).
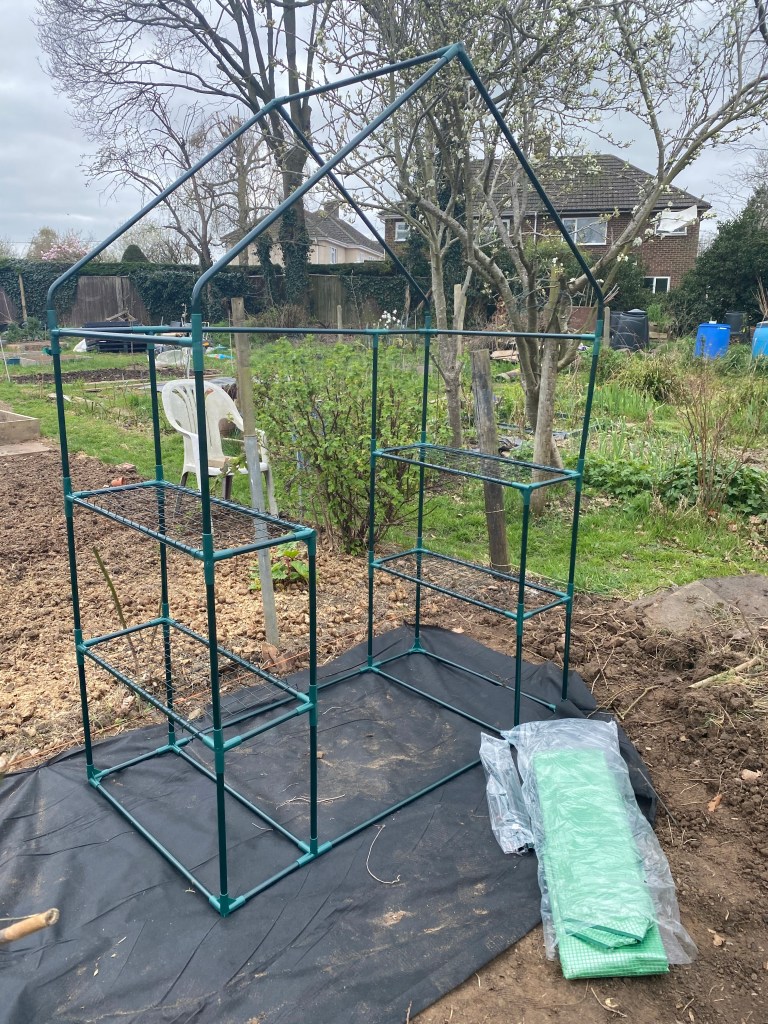
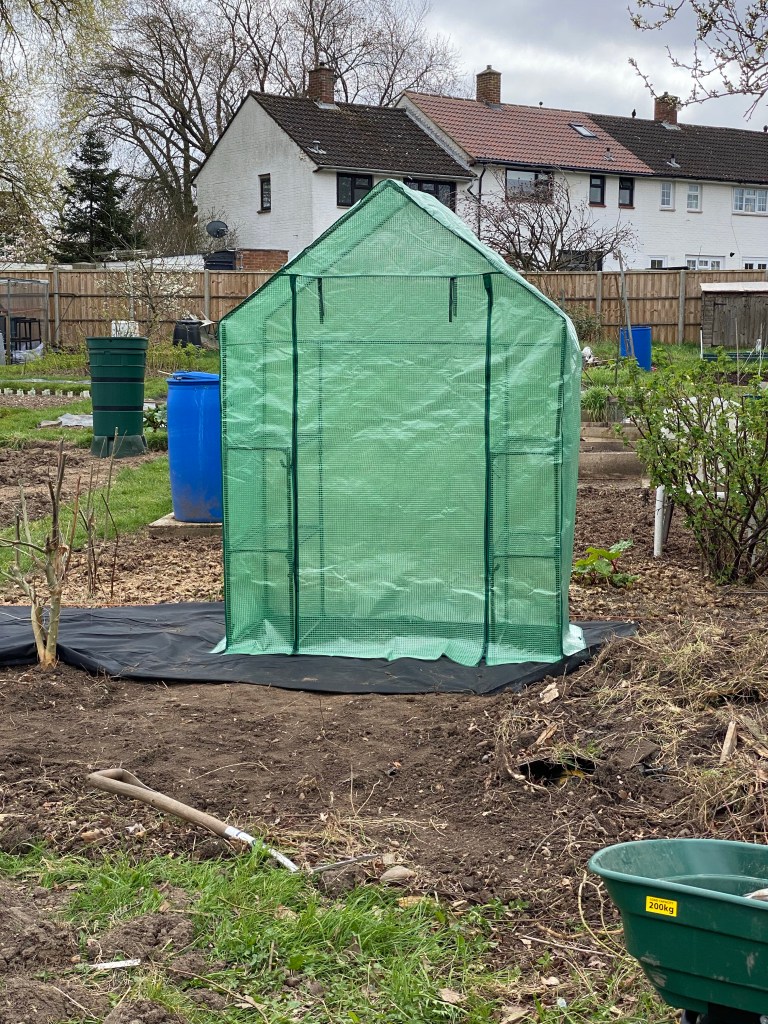
I laid some membrane and put the Wickes walk in greenhouse up! It has blown over twice leaving a nasturtium casualty (I cried). I’ve put more pegs and a sandbag on top of it now so we shall see! It really is rubbish – little more than 4 very shallow and unstable shelves. I want a proper greenhouse in my garden more than ever now. Mr B will not allow it because of ‘his lawn’. Contemplating divorce.
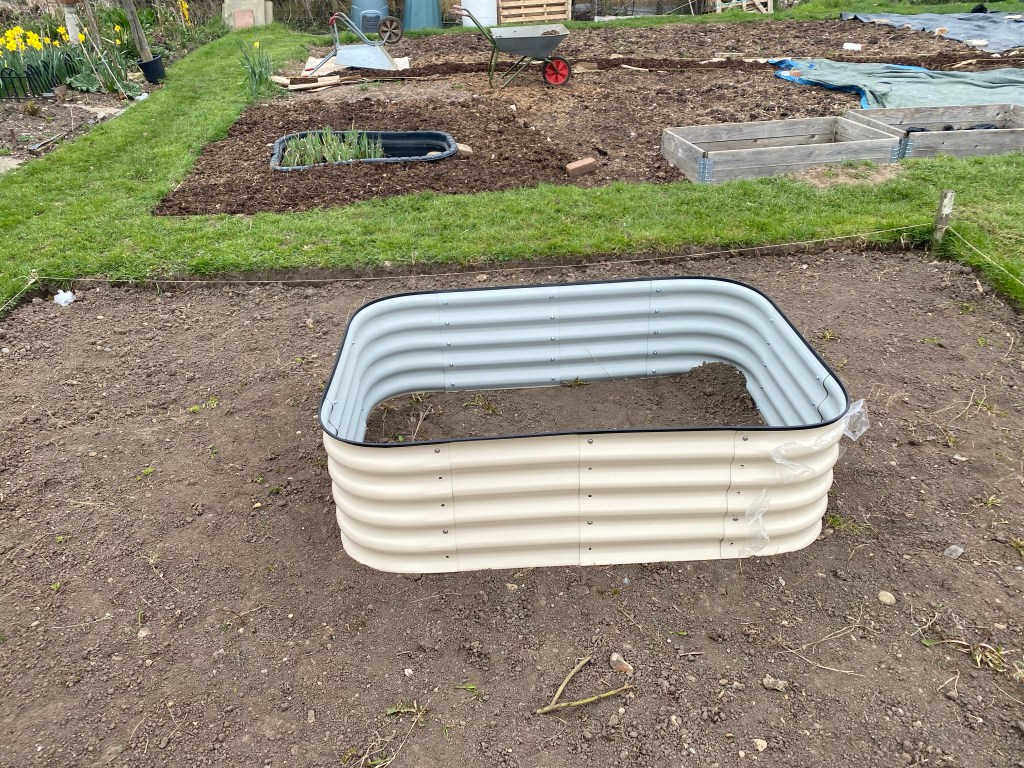
And let’s not forget the Birdie’s Original Veggie Bed! I waited months for these things to arrive and finally decided to put it up on a very warm day. I took three down to the plot thinking it would take minutes with no tools required (I’m sure i saw that advertised!).
No! This was not the case. It was full of nuts and bolts and needs 5 for each panel (8 panels per bed). The instructions seemed to suggest that a tool was contained within but alas – no! So I put in as many as I could – took me an hour and even then they are not all in (I gave up) and not tightened. The edges are also very sharp. They say to wear gloves but that’s impossible when fiddling around with nuts and bolts! I also think I need to scrape another layer of mud back to level it even more and also to line the bottom of these really deep beds! I’m not sure how I’m going to get them up! Too dangerous around the girls.
It’s been a long time since I last posted. I’ve not gone down to the plot since we dismantled everything. The council still hasn’t taken it away yet! I need to send an email!
However, I did get going with the planting up of the tomato seeds. Slightly spurred on by my boss sending me pictures of all her seed trays! It’s great to meet an actual real life person that likes to grow things!
I’ve been feeling a bit anxious in the past month or so which has affected my enthusiasm for the plot. My veggie beds are a month late to arrive too, so I can’t really do much.
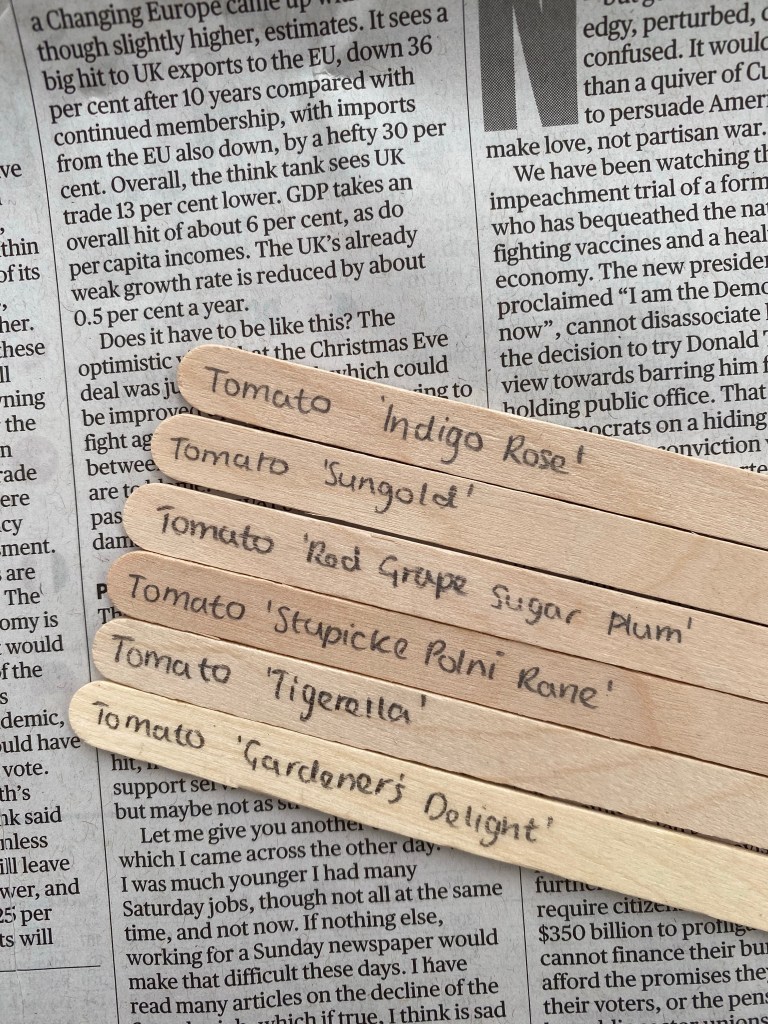
The tomatoes started quite leggy as I left the propagator lid on until all had germinated. I’m not sure if the Stupicke Polni Rein had a poor germination rate or whether my youngest attacked them. I found tiny little holes in the soil one morning.
Tomatoes, tomatoes, tomatoes
The tomato seeds are from Sarah Raven, but most are not exclusive to her. Beautiful new seed packets as you can see.
This sowing is designed to be planted in a greenhouse. So in my case – the tomato greenhouses that I got from Wilko (bargain – £10). However, I have overplanted so I hope to see what happens if I plant them out. I am also intending on some later sowings as an insurance policy.
I started the week a little bit overwhelmed and isolated. I felt the council wouldn’t help and my husband was dead against the idea of an allotment: “I will never visit.”
I met a few allotment owners who explained the previous person had the whole full plot and there is a guy who has the other half now (completely bare except for one water butt). Obviously, they chose to take the half that didn’t have all the rubbish and then just smothered it all in weed killer! Explains why it was yellow and dead looking. ☠️
I looked around – everyone was making progress – working the earth and piling on compost. Not me, I was still trying to get rid of the structure! It did move me to a few ‘fed up’ tears!
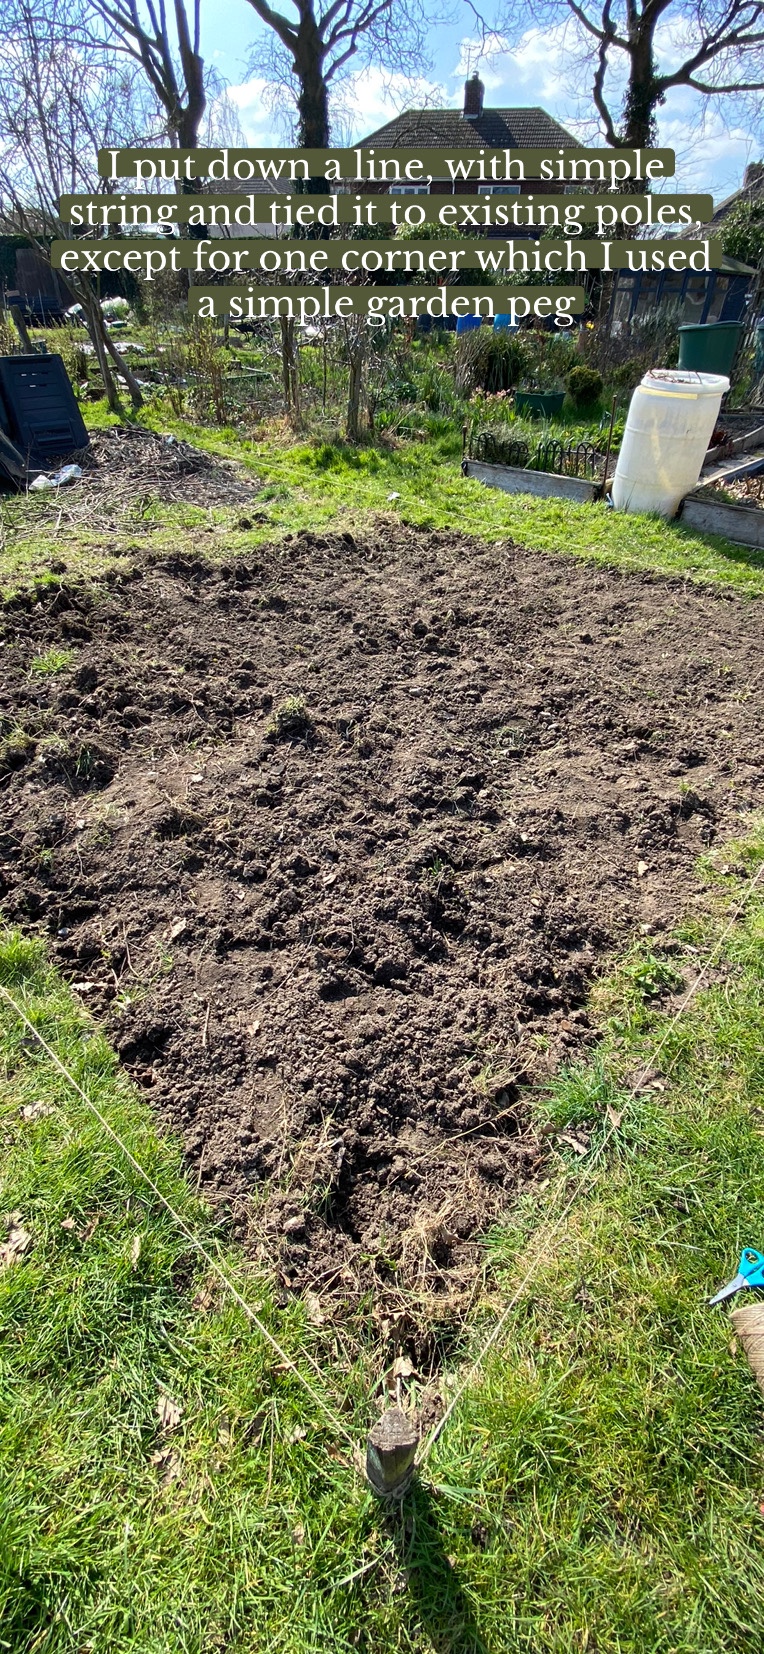
Monday: Digging and chatting
So I wrote to the council lady imploring her to help. She promptly called me and said I would need to dismantle everything and put it in the corner and then she’d arrange for some council people to take it all away. If it wasn’t in one corner they would likely not take it. If I couldn’t move it all then she would help me. Love the lovely council lady!
Mr B then said he’d help me dismantle (yay) it if the council would take it away.
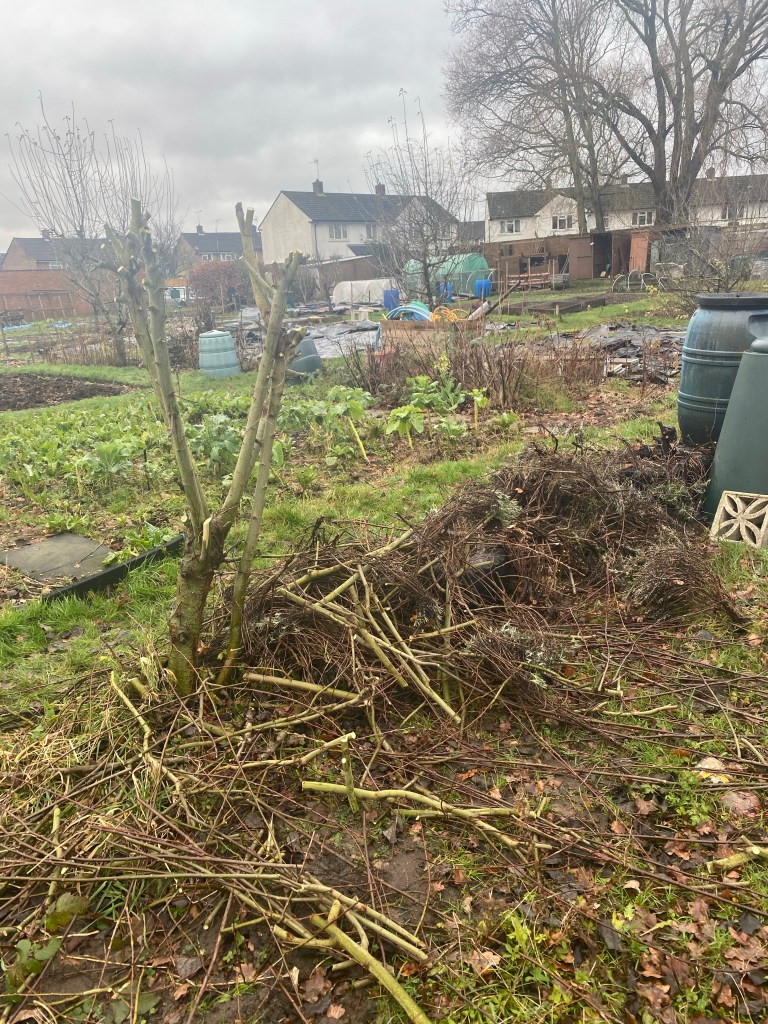
It was quite wet all week and was really hard to dig over. On Tuesday and Wednesday I clipped the tree and two huge lavender bushes. It created so much ‘stuff’ – not compostable. I then managed to move the front of the structure.
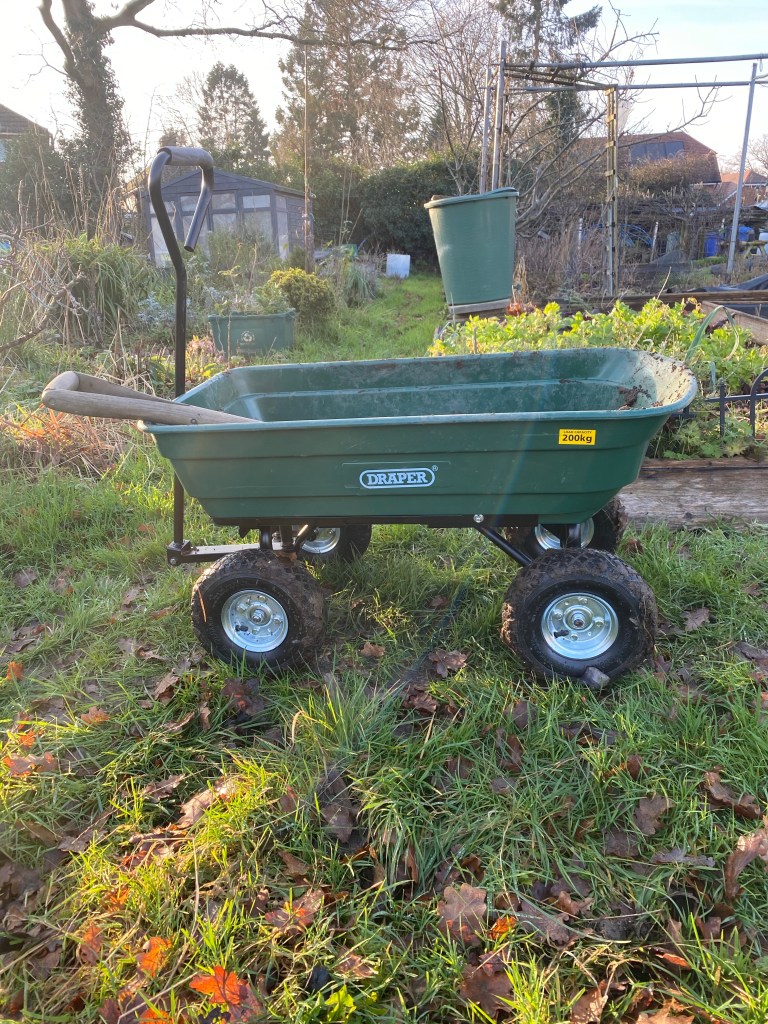
On Thursday, it rained all day so I didn’t visit. I took Friday off as leave and my amazing Draper tipper cart arrived which I put together in the morning and took down in the afternoon to shift some of the weeds I’d dug over. I did a bit more digging as the ground was a bit better although still quite wet.
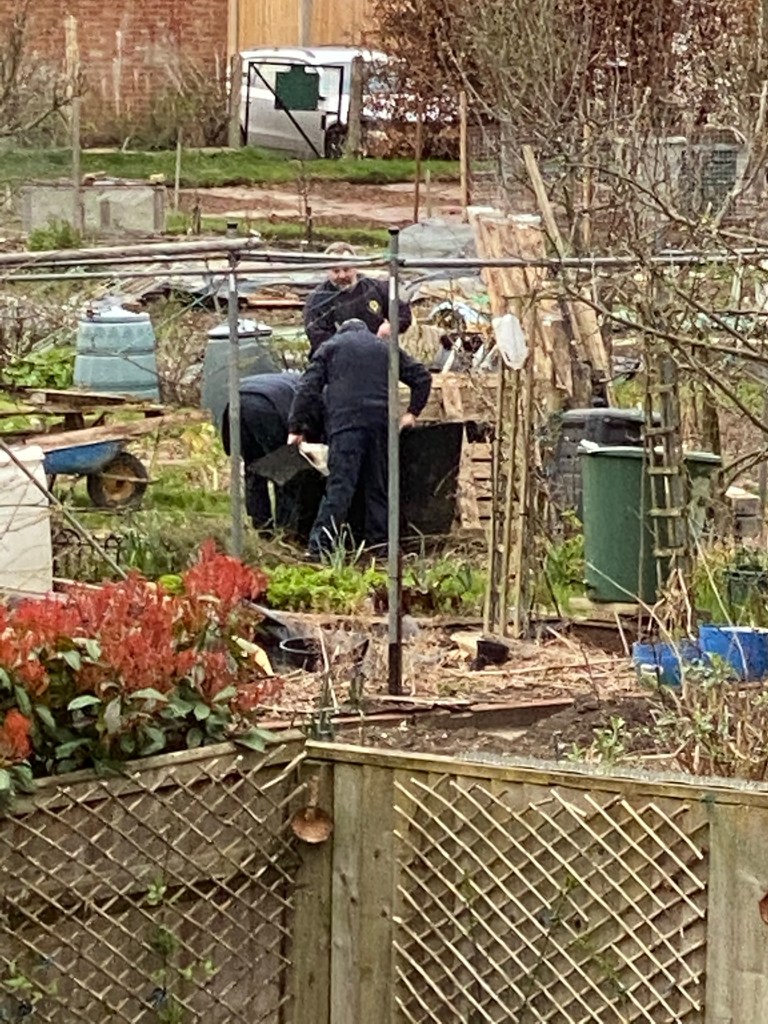
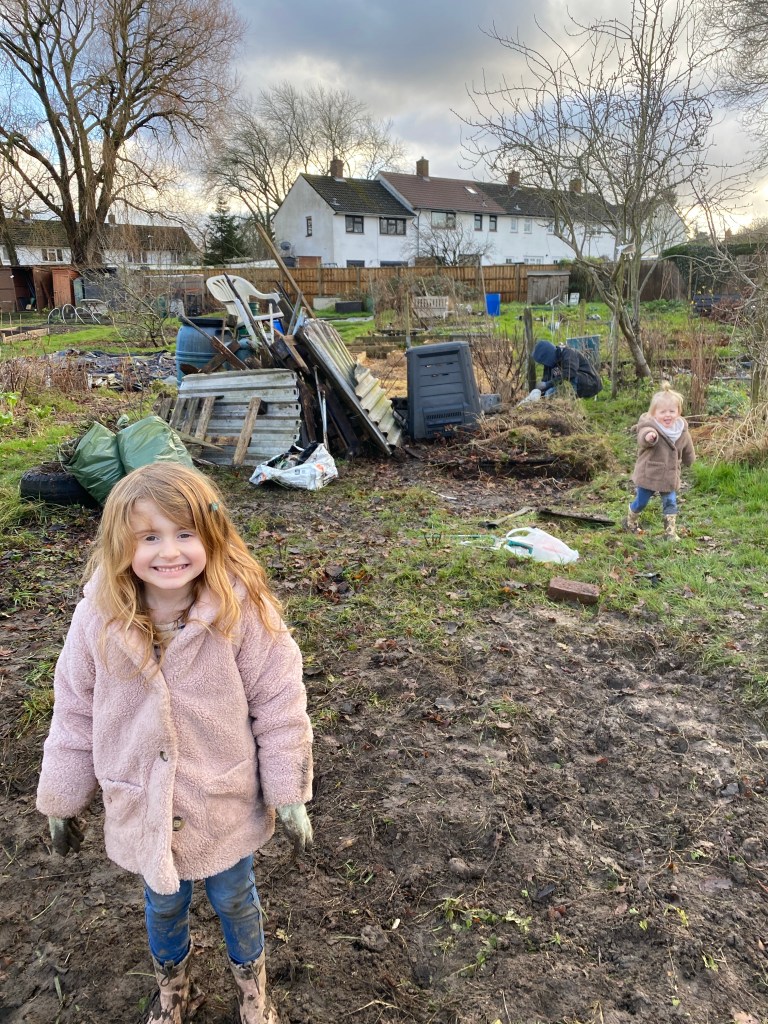
The cavalry arrived today (Saturday): Mr B and the girls!
The tree is gone (not the stump yet) and the structure is down! We also took a lot of twigs and everything that would fit in the car to the tip!
I applied for my allotment about 5 years ago, when I knew we were moving house. Allotment waiting lists are notoriously long and this has only been exasperated during the Covid, which has resulted in a renaissance in gardening.
I’ve always been into gardening and was growing vegetables from pots in my first house (when it was uncool) in my early 20s. I’m not sure where it’s come from but do remember exploring my grandad’s shed and greenhouse (overgrown after his death), gorging on the overgrown blackberry brambles and making mud pies
Now, everyone’s at it and I get little pangs when I hear young people on Gardeners’ Question Time on BBC Radio 4. It’s a good thing, as long as it’s not a passing fad! Simple garden accessories have become rather scarce, particularly in the bargain places like Wilko.
So, back to the allotment. After pretty much getting the structure of our new(ish) garden, quite small as it’s a new build, I remembered about applying for the allotment and emailed the council. How time does fly!
It seems that you need to follow up with them rather than they contact you to say you’ve reached the top of the waiting list. I think they then allocate on that basis. So, make sure you don’t wait for them to call you.
They said I was at the top of the list and they just needed to sort a few things. A few more emails chasing it up after (you get the vibe) and I was being introduced to my plot.
The Plot
Half plots are allocated as standard, and that’s probably enough at first when you’re getting established!
The council lady explained about water taps and about the garden waste. Basically, there are taps but advised me to use a water butt, and that the site didn’t have its own compost heap so I would have to dispose of waste myself.
I liked the idea of a water butt as I want to grow acid loving plants like blueberries, but on further investigation, they don’t tend to collect much water without being connected to a drainpipe attached to a roof on a building. I was advised that I couldn’t have a greenhouse or shed at this stage so it seemed to me that a water butt wouldn’t be worth it.
Half a plot measures about 4.5 x 10 metres – so quite ample! I have big ideas and want to have cut flowers as well as fruits and vegetables.
A Load of Rubbish
So, if you’re still keen after the long wait, here is your next hurdle: the state of your plot.
So your plot will probably be neglected as it takes the council about a year or so (if you’re lucky) to catch up and realise someone’s no longer maintaining their plot! This means, as standard, your plot will be overgrown with weeds which you will need to remove before you even start to think about planting!
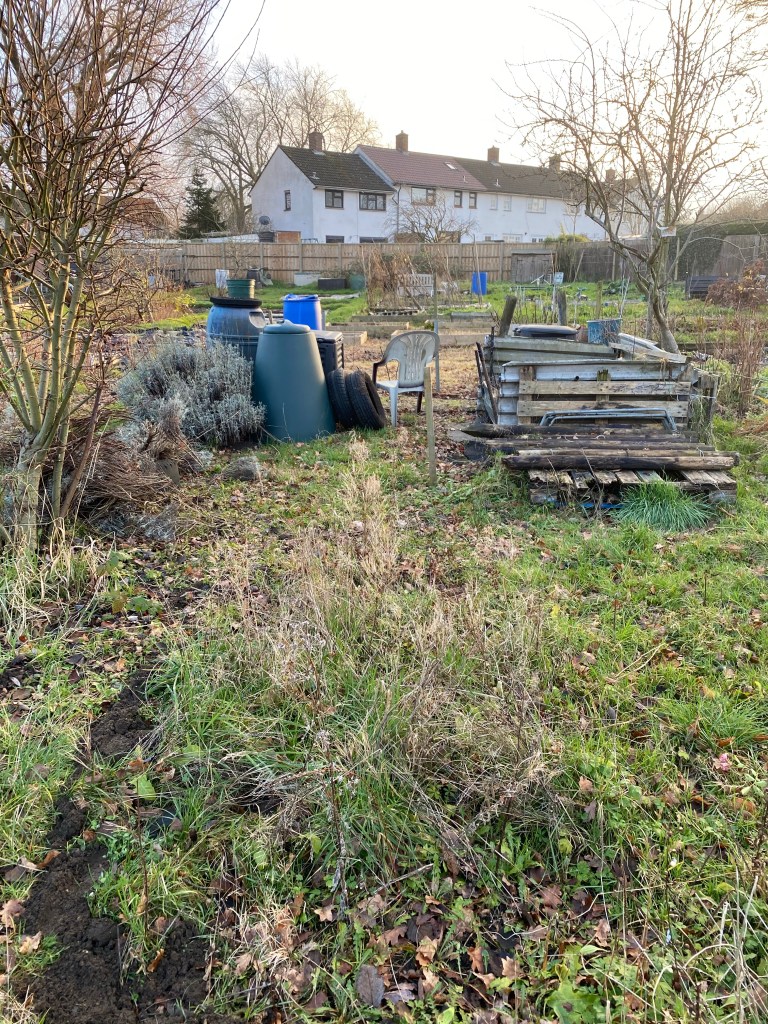
But if you’re really unlucky (like me) your new plot, that you’ve waited oh so long for, will resemble a disheveled junk yard. Oh dear. 😩
The council lady enthusiastically said she could remove the various items which sounded good and I duly paid my first year’s rent – £22.
A few months passed, albeit over Christmas, and the ‘stuff’ still hadn’t departed to a better place.
I email the council lady and she said it would be ‘difficult’ as two of her men were off with bad backs and for me to pile up the junk in the corner of the plot.
I explain it would be hard to dismantle the make shift compost structure but that it was pretty much on half of the plot (so up an end rather than a corner).
After that, she doesn’t reply to any of my emails and I realise that, unless I ‘get stuck in’, at least half of my plot will be a dump for the foreseeable future.
And I don’t have any help as Mr B wants no part of it! He is unsympathetic and hasn’t yet visited the plot!
I’ve been looking for something lovely for our bare walls for some time (it’s taken me 4 years to get to this stage). I am super picky and, in my old age, super indecisive (having made so many mistakes previously). I love pinks and turquoises – inspired by mine and Liam’s favourite colour since our childhood (although, not sure we would still say that now) and, like us, those colours they go really well with each other.
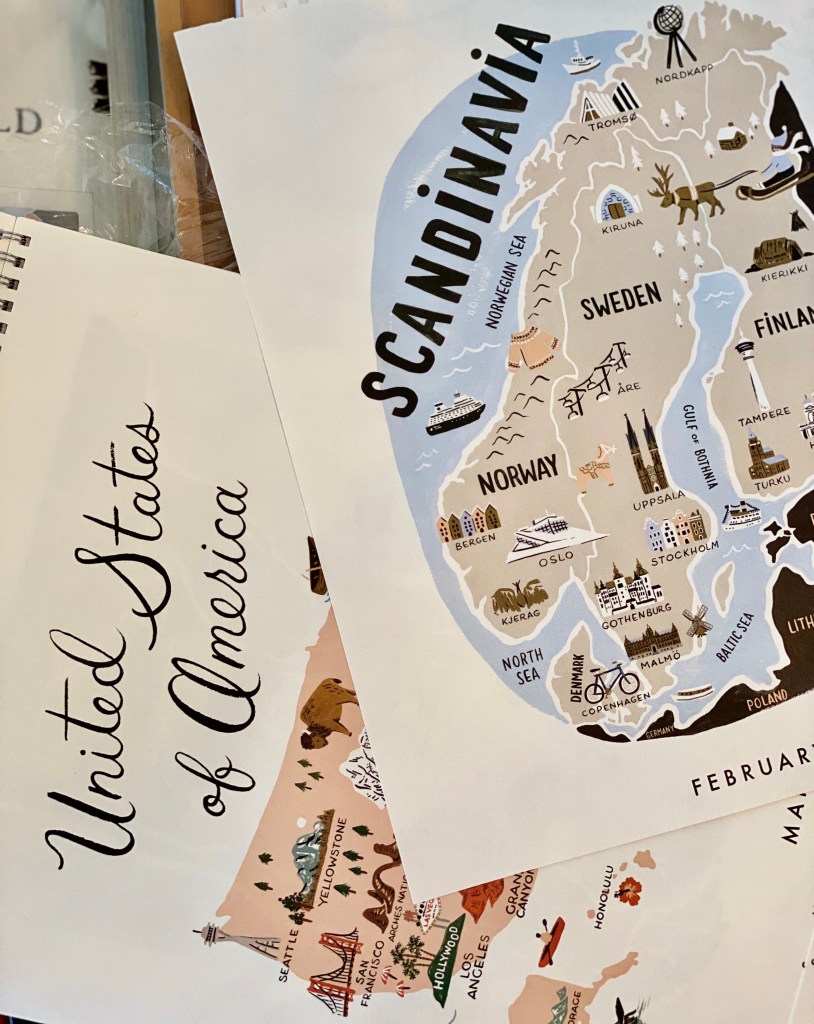
Finding Inspiration – Rifle Paper Co.
My initial inspiration came from Rebecca, of rosesandrolltops.co.uk, who introduced me to the amazing Rifle Paper Co. prints! Wow. These prints are so me and I love the pastel shades of pinks, greens and greys. They also offered amazing value if you buy their calendars which include 12 prints all for about £20-£25 on gorgeous matt thick paper. They aren’t as easy to come by in the UK, but papermash.co.uk was my main supplier. You can also get the odd bargain from amazon.co.uk. The problem is, they don’t tend to repeat the prints, so the calendars are almost like limited editions never to be seen again.
This was enough to make me panic buy, over the course of a couple of years, three calendars! Putting them on my Christmas list, as an affordable present from my mum or in-laws. As I collected them, I made sure to hide them away from my girls, and for some time had forgotten where I had actually stored them!
Buying some frames
When I finally found them, I measured them to figure out which size frames to put them in. The actual pictures are all slightly different widths and heights (between around 23-26cm width and 28-30cm in height). These are quite non-standard shapes for frames, I later found out! I had always intended to put them in different sized frames (so it didn’t look too contrived). So I spent AGES looking at different sized frames. And you know what? Most of the frames out there come in standard sizes, unless you want to pay for a frame maker to make them to a bespoke size. I didn’t have the cash for that, so kept on looking and thinking.
I’d also decided that I wanted to put a crisp white mount around them for aesthetic reasons but and figured that this would help with making them fit in different sized frames.
The only thing left to decided on was the colour of the frames. I’d seen them in white frames, and thought that it just didn’t quite look right and, more importantly, white wouldn’t go with the rest of the room.
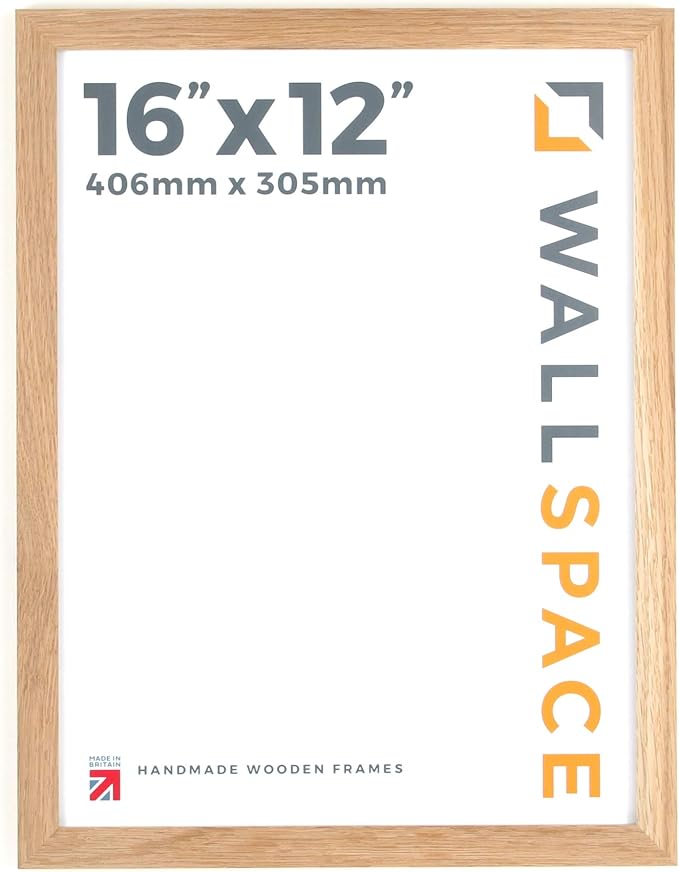
I love Desenio frames. They seem to be made with good quality wood and are super slim and stylish. HOWEVER! This is lock-down 2020 and Desenio seemed to have withdrawn their offers (usually can get at least 20% off in normal times), and last time I ordered from them it took at least 2 weeks for them to arrive. So, I turned to trusty Amazon and found some affordable solid oak frames from a UK seller (and maker) Wall Space. The reviews seemed positive and someone mentioned that the wood came bare, ready to have a stain or oil applied. I as a bit hesitant about oak and dithered a long time, as I like a pale oak colour (and not orange!). So, decided to take the plunge and bought two of each of these sizes: 16×12, 12×12 and 14×11 inches (6 frames in total).
Waxing the Frames
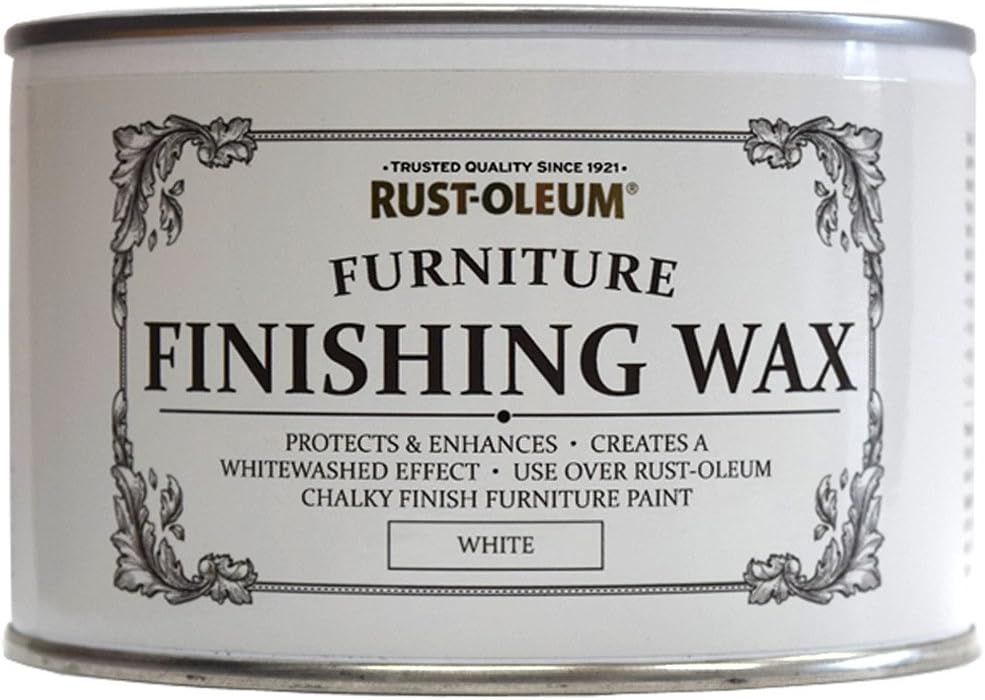
The frames arrived quickly and they were, as I thought they would be, a little darker than I liked. Luckily, I had a tiny amount of some Rusto-leum White Finishing Wax left, so set about lightening them up. I had to give them two coats in total to get the colour that was right. You brush the stuff on, leave it and then rub it with some lint free cloth (or in my case, an old tea towel). They now look amazing – it reminded me of a finish that Neptune gives to some of its whitewashed furniture.
Unfortunately, when I was taking the glass out of one of the frames, I managed to break one (it got caught on the metal catches). I wrote to Wall Space, and they were a bit reluctant to send the glass in the post for safety reasons, but I managed to persuade them to wedge it between two boards and I received it next day (very good service). Be careful with the glass, as I did manage to slice my figure just handling it. Best to use a cloth to avoid this.
Picture Mounts
So the mounts were just as problematic. I looked for specific sizes and, just like the frames, they just seemed to come in standard sizes. If you wanted to bespoke mounts then it would have worked out more expensive than the frames. So I needed to be creative again. The aperture (the middle bit) needed to just cover the edges picture (and not overlap the actual picture) and if the outside was too big to fit in the frame, then I thought I could just cut this to size (after all, nobody would see this as it would be hidden by the frame). So, to save money, I could buy a pack of 10 mounts – all the same size – and cut them to fit into my frames. And, yes, I turned to Amazon for this too. I got 10 16×12 for 12×10 inch picture white picture mounts from the Frame Company (seller is called “paintings frames”). They cost £12.95 + £3.95 for delivery. This was actually quite cheap to some of the others. The mounts are a lovely thick card too.
To cut them, I placed the board of the frame I wanted to insert them into in a central position and then drew around it in pencil. At first, I tried to cut them with a blunt(!) razor blade and a ruler, which was awful. So in the end, I resorted to using scissors. Yes, it did give a slightly rough edge, but it didn’t matter because it would be hidden by the frame. I found that if I cut just inside the the line (not on the actual line) it helped the mount slip into the frame much better (being slightly smaller). One thing to note is that the mount aperture was a little too large in length for the 12×12 frames, so I just used the sides. I think I just about got away with it, but it might not be to everyone’s taste.
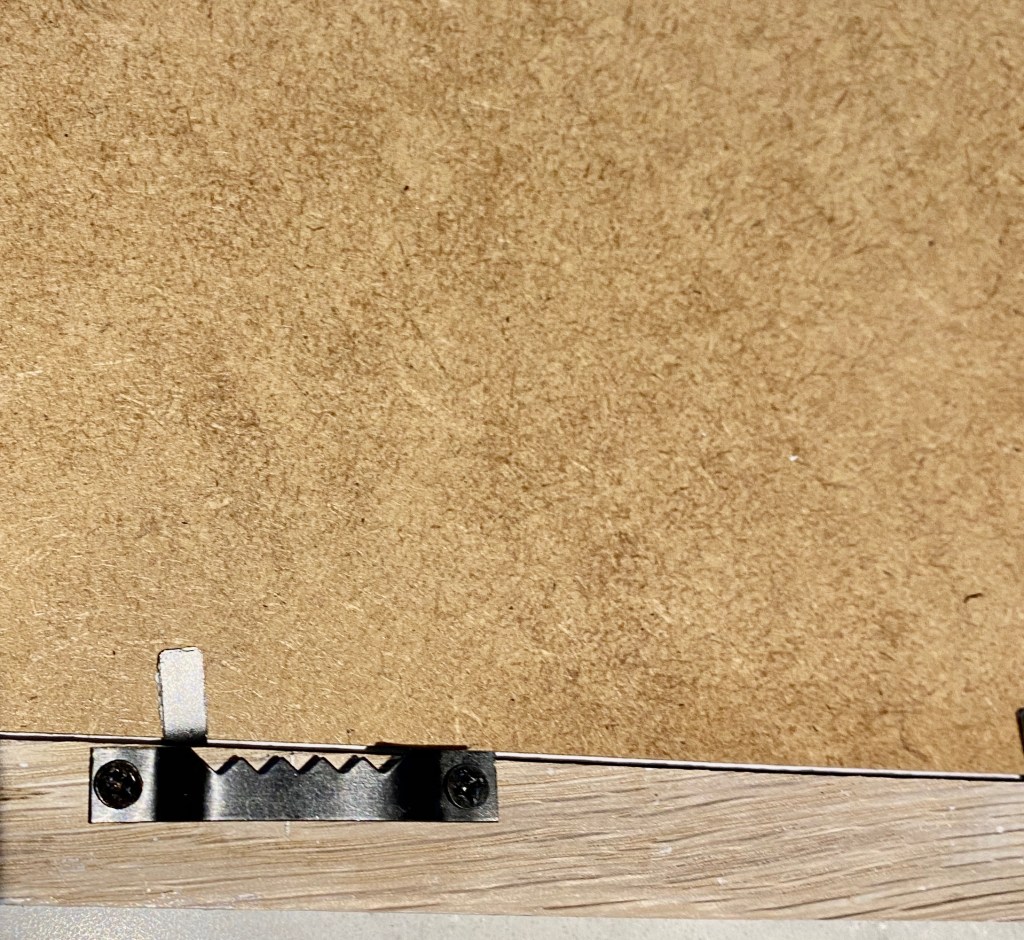
Hanging The Frames
One thing to note about these frames is that they they don’t come with a hook or anything to mount them on (except the 12×12 ones). They do provide some fixings but I did not get along with these at all. In the end, I decided I would get some black sawtooth fixing with mini screws, and also treated myself to a cheap cordless rotary tool which I could use to drill tiny pilot holes (thinking a big drill would be too ham-fisted). I also wanted to use it for a garden project and for intricate sanding, and plus I love a gadget. 🙂
So I order these (Amazon again *rolls eyes*) and they came the next day. They worked perfectly!
Mixing them up a bit
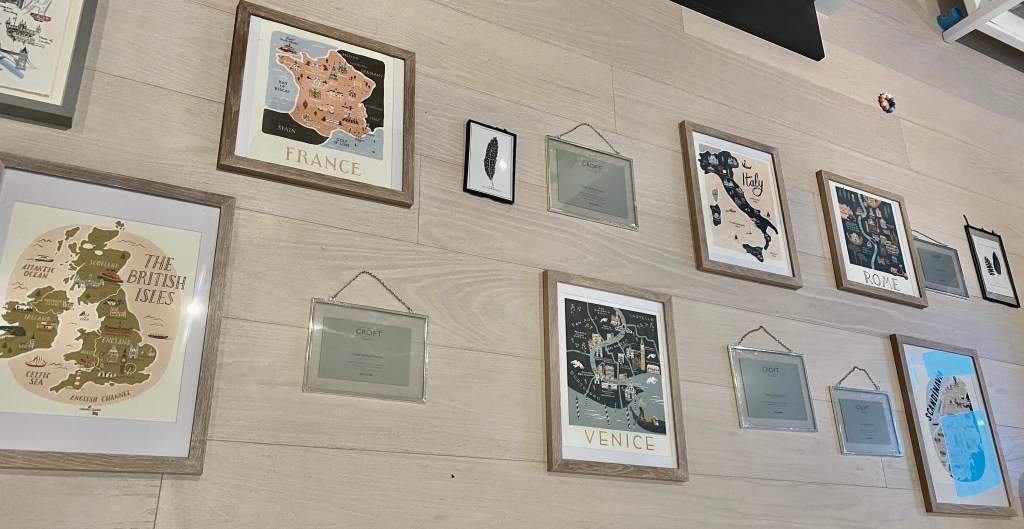
So, I didn’t just want to have a wall full of the Rifle Paper Co. prints. That would be lovely, but I wanted to make it a little more personal and I also had a few things to use up! Combining them with other types of prints, frames and photographs would mean that I would get that ‘eclectic’ look I was after.
I’d managed to pick up some silver-plated hanging clip frame (the vintage style) from John Lewis at a bargain 75% off, without really knowing what I was going to do with them. I had forgotten about these too (having stored them at the top of a cupboard (again, away from the girls), and so was delighted to find them when we were doing some decorating. These dainty clip frames inspired me to use them for holiday photos of us, near or in, the places of some of the Rifle Paper Co. prints, to make them personal to us.
I then also had some old Alice Tate prints of New York and London that we bought from John Lewis YEARS ago, and just couldn’t decide what to do with them in our new house (you know, when you buy something for your old house but they don’t quite work in your new one). These prints came with a really nice light grey frame.
So I decided that I would throw them all together, really fast the last minute, and was really chuffed that I was going to finally put some of my ‘finds’ to good use.
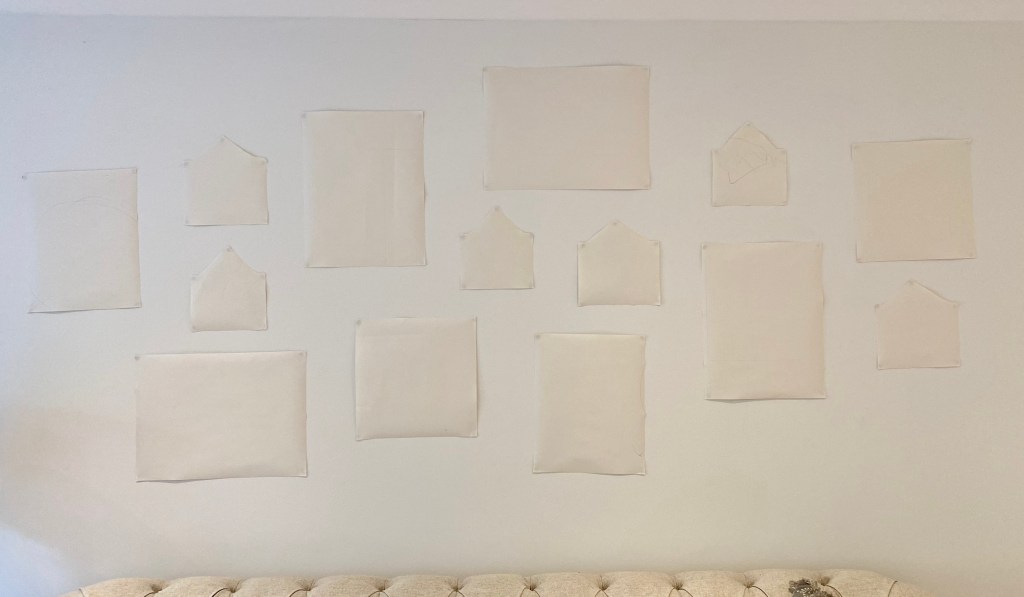
Arranging them on the wall
I wasn’t really planning on spending a lot of time planning out exactly where they would go on the wall. But as I laid them frames out on the floor, I found that it was going to be harder than I initially thought. I found that laying them out on the floor wasn’t giving me a true visual of what they’d look like on the wall. I wanted them in a jumbled look, but I wanted them to obviously look good too. It was difficult to tell how much wall space (and how high) you could hang them when planning on the floor. In the picture below, you can still see me deliberating on using a black clip frame. *so indecisive*. 🤷♀️
So I turned to trust Pinterest for inspiration. I saw a lot of cut out pieces of paper for planning, which I thought just looked like faff! I also couldn’t find any layouts which matched what I was trying to achieve. I did notice that a lot the gallery walls went right up to the ceiling and quite low down. So, in the end, I did decide to do the paper planning thing! I am so glad I did. I used a roll of the IKEA kids paper and just drew around my frames and cut them out. I then stuck them to the wall with Blu Tack until they ‘looked right’.
Once they were up, I was able to measure where the picture hangers were and draw my drill holes. The templates made it super simple to do this. So, although it was a bit a faff to do, it did mean that the pictures would pretty much end up exactly where I wanted them. I didn’t use a spirit level once. This is one of the perks of having a ‘jumbled’ look too.
For the pictures frames, I drilled the holes with a standard drill and put some wall plugs in. I put the screws in so they were barely sticking out (just enough for the hanger) so they would sit as close to the wall as possible.
For the clip frames I used some pretty brass nails which I hammered in.
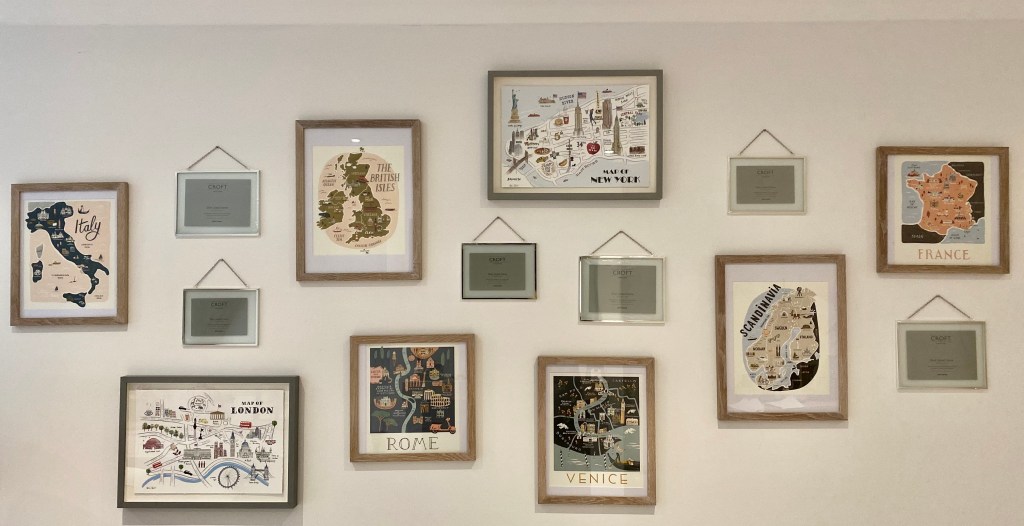
The nearly finished result
Still not finished, but I am really pleased with them. I’ll upload the final version (with my camera) when I have managed to choose some pictures for the clip frames!